Try Spring Inspired Recipes and Crafts!
9:25 PM
New Spring Inspired Recipes and Crafts:
Spring is here and it's a great time to hangout with family and friends. Flowers are blooming, and the weather is nice so it's a good time to have your own party!
Treats:
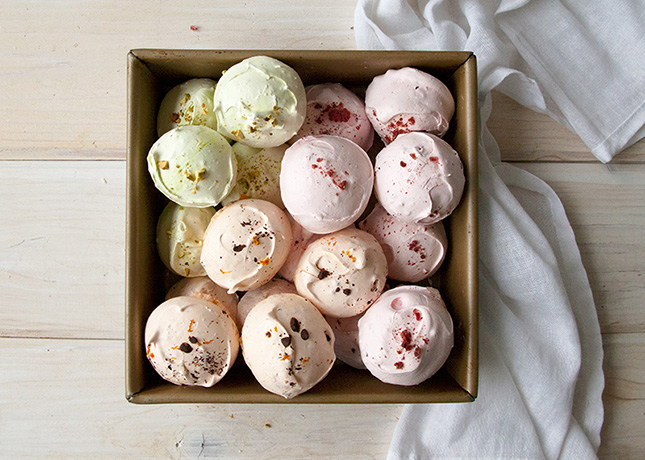
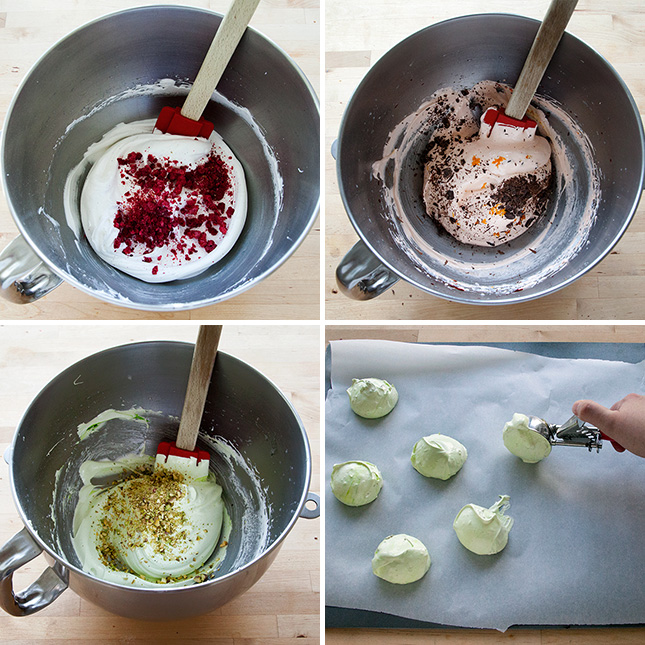
Pastel Meringues by Tessa Huff
Ingredients:
3 Large egg whites
3/4 Cup caster sugar
Pinch salt
1/8 Teaspoon cream of tartar
1/2 Vanilla bean, seeds removed
3 Large egg whites
3/4 Cup caster sugar
Pinch salt
1/8 Teaspoon cream of tartar
1/2 Vanilla bean, seeds removed
Add-ins:
1/4 Cup finely chopped pistachios – for sprinkling
1/2 Cup freeze-dried raspberries, minced – for sprinkling
1/4 Cup chocolate shavings + the zest of one small orange – for sprinkling
green, pink, and orange gel food coloring
1/4 Cup finely chopped pistachios – for sprinkling
1/2 Cup freeze-dried raspberries, minced – for sprinkling
1/4 Cup chocolate shavings + the zest of one small orange – for sprinkling
green, pink, and orange gel food coloring

Instructions:
1. Preheat oven to 215 degrees F.
2. Line baking sheets with parchment and set aside.
3. Place egg whites, sugar and vanilla bean seeds in the bowl of an electric mixer. Whisk to combine.
4. Add a couple of inches of water to a medium saucepan and heat over medium-high heat. Then place the mixing bowl on top of the saucepan to create a double-boiler.
5. Heat for about 3-5 minutes or until the sugar has dissolved and mixture is warm to the touch.
6. Return mixing bowl back to a stand mixer fitted with a whisk attachment. Beat on high speed until glossy stiff peaks form (about 5-7 minutes or until the bowl of the mixer is cool to the touch).
7. Halfway through mixing, add in the cream of tartar and salt.

8. With about 1 minute left, add in gel food coloring.
9. Stop mixer and removed bowl from stand. Add in the raspberries, pistachios, or chocolate shavings and orange zest and gently fold with a rubber spatula to combine.
10. Using a large disher, cooker scoop, or serving spoon, place dollops of meringue on the parchment-lined baking sheets. Then sprinkle with pistachios, raspberries, or chocolate shavings and orange zest.
11. Bake in a preheated oven for 1- 1 1/2 hours, or until the outsides are crisp and dry and the insides are chewy.
12. Serve immediately after cooling or store in an air-tight container away from any humidity.

Fresh Strawberry Cake by The Country Cook
+(1).jpg)
Ingredients:
FOR THE CAKE:
1 box vanilla, white or yellow cake mix
1 (3 oz.) box strawberry gelatin mix (JellO)
4 eggs
1 cup vegetable oil
1/4 cup water
1 pint fresh strawberries (or 1 cup crushed fresh strawberries)
FOR THE ICING:
1/2 block (4 oz.) cream cheese, softened
1/3 cup butter, softened
2 cups powdered sugar
1 tsp. vanilla extract
1 tbsp. milk

Preheat oven to 350F degrees
Spray 9x13 baking dish with nonstick cooking spray.
.JPG)
Remove the stems and dice them up.

This will probably take you a minute or two.

Mix until combined.

Then stir in your oil, eggs and water.
.JPG)
Once that is combined, add in 1 cup of your smooshed strawberries.
.JPG)
You will want to gently stir those in by hand.
.JPG)
Then pour batter into baking dish.
.JPG)
Bake for about 30-33 minutes.
Allow cake to cool completely before adding frosting.
.JPG)
It's easiest if you have an electric mixer.
.JPG)
Mix until smooth and creamy and lumpfree.
.JPG)
Mix until smooth and creamy.
.JPG)
.JPG)
Then slice and serve.
.jpg)
Crafts:
DIY Flower Tea Lights by Glue Dots

Supplies:
Glue Dots® Advanced Strength DispenserFaux silk flowers or petals
4 plastic spoons
Battery powered tea light
Pliers
Scissors

Direction
- First, cut apart your faux flowers. Cut the bottom edge of each petal into a curve.

- Use pliers to cut the handles off the plastic spoons.
- Using Advanced Strength Dispenser, adhere a petal onto each of the spoon backs.
- Place two Advanced Strength Glue Dots on top of one another to form a thicker glue dot, and then adhere the spoons to the tea light. The extra helps with the curve of the spoons. The spoons should be evenly spaced around the tea light.
- Adhere additional petals around the base of the tea light to form the flower. Fill any gaps. It will take about two more rows of petals.

Yarn Easter Eggs by Six Sister's Stuff

1. Blow up water balloons. Blow them to the size you want your eggs.
2. Make your glue. I’ve seen liquid starch, and mod podge, but I didn’t want to use those items so I went back to the basics. Pinata Paste. I first added 1 cup flour and 1 cup water and whisk together. (I used a round cake pan because I could see the flour chunks easier). Then I slowly added a little more water until I got the consistency of Elmer’s glue.
3. Yarn. Next I added my yarn into the bowl and let it soak for about a minute. My yarn was about 3 yards long per egg. Some people us a lot of yarn on their eggs but I didn’t want to use a ton. I like the fact that you can see through them. If you don’t have enough yarn.. no worries you can soak another piece of yarn and continue on the same balloon.
4. Put Your Yarn On Your Balloon. As I slowly pulled the yarn out of the glue I would run it through my fingers to get rid of any access glue. The less glue you have the cleaner your eggs will be.
When you are finished to put them on a cookie sheet. I put mine outside to dry in the sun and it didn’t take very long. Don’t forget to roll them over to get the bottom side of the ballon dry. I also let my balloons dry and harden completely overnight and inside so they won’t blow away.


0 comments